Thursday, August 8, 2013

Daily Five!

Daily Five -- or as I like to call it -- THE BIG FIVE!! 


The "Big Five" is such a huge part of our classroom. We do it during our "Workshop Time" where the kids are working on things they need to do while I pull my groups. I have always reserved this time for my last hour or so of our time together. Since so much of our time is dedicated to Workshop/Big Five, I have to know that it is going to good use and that the students and I are getting all we can out of it each day. 

I am such a big fan of color coding (my first class is Blue and my second is Green) so I have color coded the 5 parts of the daily five. All the labels on the door are colored accordingly.

1. Listen to Reading - Blue
2. Work on Writing - Orange
3. Read to Self - Green
4. Read to Someone - Pink
5. Work on Words - Yellow 

Even though we may not get 5 rotations done during our Workshop/Big Five time doesn't mean we aren't hitting all 5 of these each day. Everyday my students are writing, reading, and working with words before we even get to the part of our day where we are doing Workshop/Big Five! 


THE BIG FIVE DOOR 

Here is a look at how the students and I know where they are suppose to be. There are 22 "choices" (at the beginning I rotate them through, but as the year progresses and they have the procedures down and are doing exactly what is expected, we move to them choosing) because then I can decided just how many students are reading to self, reading to someone and so on. 


Since I do teach two classes there are two fish (a blue for my homeroom and green for my partner's homeroom) on each of the choices or big five spots. This way if the blue class gets to do more rotations the green class doesn't miss a spot. If one class has more students than the other, I still have 22 fish up, just a few may be our "spot holders" for any potential new students. I haven't finished putting all the fish up, but before school starts all the choices will have 1 blue and 1 green fish!! :)  


This is the Reading Resort, basically our classroom library, and where students "Read to Someone". There are 2 spots for this area on our Big Five Door at the beginning of the year, so there will be 2 people at this station reading together. By the end of the year I will have 4 spots open in our resort.


The Buddy Beach is also where students "Read to Someone". There are 2 spots for this right now on our Big Five Door. 2 students choose a big book, read it together and then fill our the story map afterwards. When done they erase the story map, choose a new big book and start over! 


The Block Barrier is where one student takes the tub of blocks back to their seat and create sentences using the blocks. I saw this on Pinterest and loved it! The kids loved it too. I will have to make new labels because they were torn up from so much use by the end of the year. 


The Listening Lagoon belongs to the "Listening to Reading" part of the daily five. Right now there are 2 spots for this on our Big Five Door. I number the two tape players so if their name is on Listening Lagoon 1, they would go to the tape player with a 1. The while tub holds all the books on tape for them to choose from. Before they start listening to another book, they have the option to go take an AR test on their previous book - if everyone who signed up at the beginning of workshop time is done. 

During the third nine weeks (STAAR panic crunch time)  I add another tape player to the Listening Lagoon and the student chooses from these activities on tape. They really like them. I like waiting since there aren't that many and they are good review for the kiddos before our big test.  I may begin adding them one at a time after I have taught the concept this year... hmm... 


Our Computer Coast houses 3 computers where 3 students are doing different things. 
On computer #1 they are "Listening to Reading" to websites like MeeGenius! (a chrome app) or  http://www.storylineonline.net/
On computer #2 they are "Reading to Self" on sites like  http://www.tumblebooks.com/ This site is really cool because it also offers quizzes after the students read. 
On computer #3 they are "Working on Words" by typing up their spelling words and then using them in a story. The kids love this because they can use different fonts and colors and make it their own. 


 Here is our most popular area, the Creator's Cove, or writing table. Here three kids come and can create anything. The masterpieces that come out of this area are amazing. Last year I had kids creating elaborate books, graphic novels, greeting cards and much  more! They were excited to come and use the different craft pieces and construction paper to bring their imagination to life. I do limit how many the kids can get of craft pieces, paper and ect... but they know if they ask nicely for more I will always say yes! 


The Techno Tide basket is where our 4 iPod devices and kindle are stored. On each iPod there are different games and activities relating to whatever part of the daily five it is focusing on. The kids LOVE all things techno and I am just so grateful to be have so much technology in my room! 


The Learning Landslide is an area where different buckets with different activities are kept. The student at that bucket gets their bucket and takes it to their seat to quietly work on. Since there are so many different stations in my classroom I only need 4 buckets, 1 student per bucket, in the Learning Landslide to have 22 spots on our Big Five Door for 22 potential students! My first year I needed like 20 buckets, so I am still in awe about how much technology has flooded into my room the past few years!! 

The activities in these buckets change frequently. I always put the easier, no directions really needed activities at the beginning of the year. I like to teach the different reading/word study/writing games during my small group time and then cycle them into the buckets as a review.  


Learning Landslide #1 is where the students "Work on Writing". The student can choose from the many different funny prompts and expand the story. The kids enjoy it the first time, but it is a bucket that is very short lived and last long enough for me to teach and rotate in some of the other writing activities! It is a good easy one to start the year off on though. 


The second Learning Landslide is apart of the "Read to Self" family and where I creep in some social studies! Here the kids have a fun puzzle they can put together of the states, then they can choose a state to research and fill out the white board. Then they can erase it and choose another state to research. I have several different puzzles (we all know how those help develop good problem solving skills) and other social studies activities to switch in. 


Learning Landslide #3 & #4 are very similar in that they are both "Work on Words" and both involve using the spelling words. In #3 they are stamping out their spelling words and words from our Word Wall. In #4 they are doing the same thing but instead of stamping, they are using magnets. At the beginning of the year these are simple and to the point. As the year progresses I will drop one of these and replace it with other word study activities. 


My last Big Five spot, and one that is VERY important is the Learning Lifeguard.
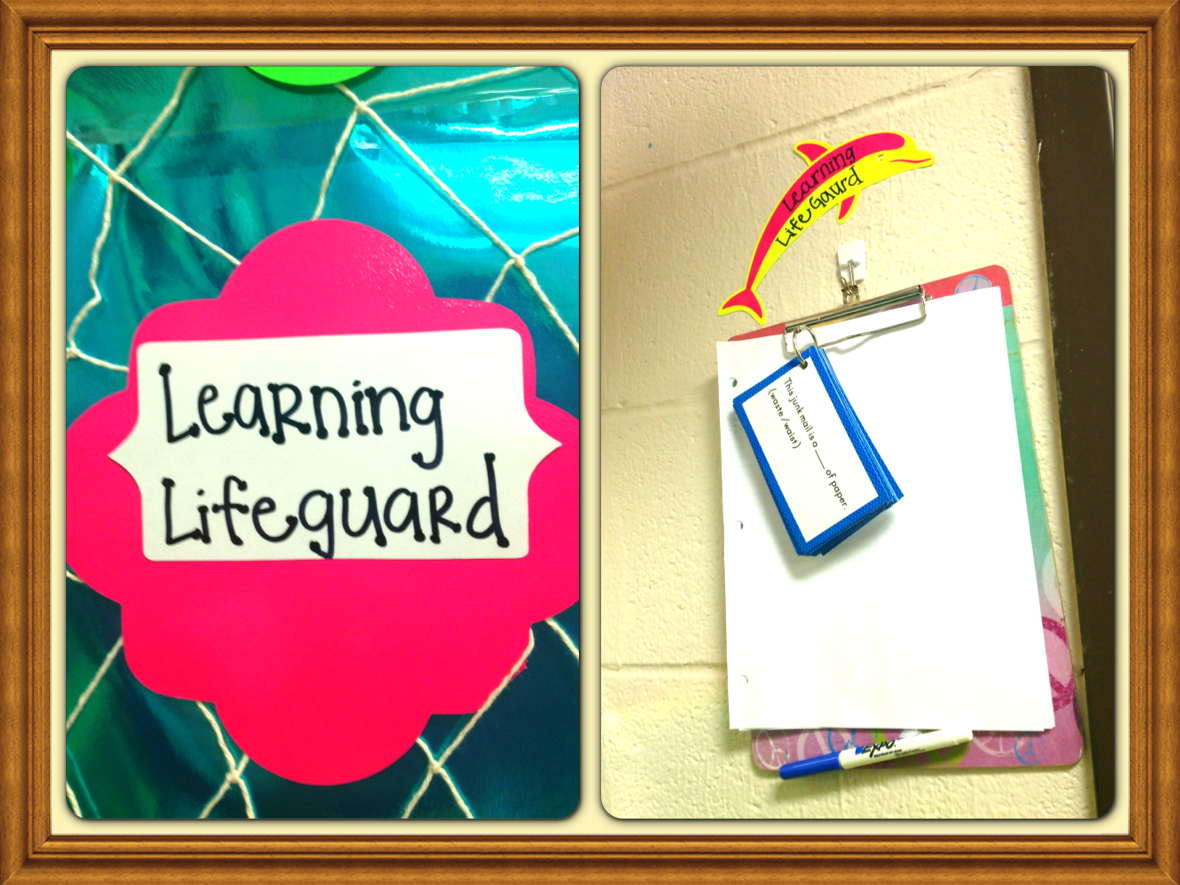
Here one student is the lifeguard, or boss, during workshop time. They get the clipboard, walk around and make sure everyone is doing what they are suppose to be doing. Certain problems that are easily missed by the teacher who is actively working with her small groups are kids drawing on the white boards instead of doing whatever they are suppose to be doing, talking about off task things at the "Read to Someone" areas instead of reading and discussing what they read... ect. 
The Learning Lifeguard makes sure everyone is on task, answers any questions anyone has and is the only one who is allowed to approach me during this time. They take their job very seriously. While they are walking around they are also practicing their homophones on the cards attached to the clipboard. :) 

Happy Teaching Friends!!

Wednesday, August 7, 2013

Two Classes - One Classroom


If you partner teach you know all about the pros and cons of having two class - 44 students. 

I LOVE that I only have to focus on ELA/Social Studies and don't have to worry about math/science. I also love having a partner, someone who can share and understands my joys and struggles with students and who is there for parent teacher conferences! 

What I don't always love is that it feels like I could always use more time, which I am sure I would feel even if I was self contained! Effectively managing two classes in one classroom can be a challenge all on it's own from how to organize their desks for two people to behavior management.  

My partner and I agreed to color code our classes, that way it isn't "my class" and "your class" - they are all OUR students. We just have a blue and green class. Everything is color coded blue for my homeroom and green for my partner's homeroom. 


I personally have tried EVERYTHING under the sun when it comes to managing my 44 students folders, spirals and books in my classroom. I have done tubs with their supplies on another shelf (all that did was take up my shelf room and take away from learning time having them go and get their supplies constantly). I have tried the bottom part of desk for my homeroom and the top part for my second class. The second class never had enough room for their books, pencil bags and all their other supplies! 
THEN it hit me. While my other ELA team member and I were planning our first few weeks and complaining discussing the issues we had with managing each student having 2 spirals, 1 daily folder, at least 4 books, a pencil bag and a behavior folder plus two workbooks in one desk AND the textbooks we would want to store in their desks for easy and quick access --I saw my two book holders and shoved them in the desk and sure enough - they fit! Now each student can have their own tub (obviously in their right class color with their names written on the fish) which clearly holds their daily folder, two spirals and a few books from our classroom library (the items that don't leave my classroom ever) with enough room left over for their other supplies. Those tubs will stay on the bottom and their textbooks will stay on top! PERFECT!!! 


Another problem that can occur when you teach two classes is how to manage behavior easily and effectively AND what to do with desk name  tags. The problem with taping their name tags down is that you would be taping down two student name tags on one desk and what would you do if only one student needed to change to different table but not the other student? (Besides picking off all that tape which is already gross looking because the kids have picked at it during your lessons and now it's brown from dirt -
I've  been there! Ew. Nasty!)
I use Velcro. (A product I spend WAY too much $$ on each August!!)  I Velcro down a green and blue name tag on each upper corner of the desk. That way if the student in the green class isn't meshing well with their table group and needs to move, but the table group is perfect in the blue class, all you need to do is rip off the green badge, grab their niffy tub and switch them to a new desk! 
I also use this for my management. If at any point a student isn't doing what they are suppose to be doing, they move their badge to the Velcro on the behavior strip. This is especially handy while I am teaching. I don't have to stop my lesson for little Timmy who is throwing erasers across the room. No, all I need to do is walk by, take off his name badge and stick it to the strip - without ever missing a beat in my lesson!! I'll talk to little Timmy about how throwing erasers isn't the best choice during a more appropriate time...  :) 


Another management tool my partner and I use is the blurt chart. This is for the minor behavior issues like blurting out, talking, or out of their seat to go talk to a friend across the room without permission. Each time they do any of those things they move a mouth, (because they were moving their own mouths!) each mouth represents a warning. They get 4 warnings. If they move a fourth mouth their behavior folder gets marked. This is the blue classes blurt chart. The green class has their own. The charts travel with the classes. So when my blue class goes to my partner's classroom a student takes their chart and bucket of mouths with them and someone from the green class brings theirs and hangs it up where the blue classes was. 
The mouths they earn in one class follow them to the other class. So if they earned 2 in my room and then get 2 more in the other class, their folder would get marked. This keeps my partner and I unified and makes it more of a seamless day for the students, reinforcing that the rules are the same. 


Students turn in their completed work into their colored tub, in the file with their name. This makes recording grades much easier because it is already in ABC order and eliminates the whole 
"no name... which of my 44 students does this paper belong to...?" 
 I take the tubs home on Friday, grade everything, file it BACK into their folders and then first thing on Monday the students will collect their graded work and take it home. 


I keep track of where each of my students are in the writing process. I do this so I know they are on track, especially since after the first few papers I just tell them when their paper is due and they have until then to get it done! I color the tips of clothes pins green or blue. Each student's name is written on a clip. The blue class clips are on the left and the green class clips stay on the right. The students move their clips as they work through the process. I love this because it is very easy for me to go up to it and call out the students who need to pick up the pace a bit on their writing. 


I have my students take home all failed assignments to be signed by parents and returned the next day. The past few years I have always had these thrown on my desk to eventually be mashed up into another pile and shoved somewhere. This year I am using these blue and green trays for students to come in and put their signed assignments here. I am hoping this solves my problem of papers everywhere!! 


I will post at a later time how I run my daily five and small groups with 2 classes... those areas aren't set up yet...!! :) 

Happy Teaching Friends!!! 

Third Grade is OCEANS of fun!

So our school theme this year is all things "oceany" and I am super excited about how the theme worked into my neon/bright room and especially how it turned out! :) 


I only teach ELA and Social Studies so you won't see any math or science gracing these walls but you will get your fair share of reading, writing and word study! I do teach two classes, one the blue class and one the green class and everything is color coded. I will post later how I manage 2 classes and 1 room! 


This is our library, or the "Reading Resort" (yes, I know the sign in the frame says Reading Cabana, but my husband nicely pointed out that all my other spots have alliteration and both words should start with the same letter) and I am over the moon with how it turned out. It is to the left of the door and begins the reading part of my room. The door with the netting is where I will hang up our "Daily Five" choices. The buckets will hold different daily five activities. I will post more about this when I am finished! 


Here is our "Behavior Bay" with our Whammie (a wonderful term I stole borrowed from my AMAZING mentor teacher while I was student teaching) Menu and our Behavior Strip. Look for my post about management to read more about this! 


Here is our "Reader's Reef" bulletin board which houses AR signup and will also host our "Story Elements" bulletin board set. I like to hang that up bit by bit as we discuss each element.  :) 


My white board is a central part of my classroom with a lot of information for the students. It also separates the Reading corner of my room from the writing corner. My white board is really just a wash board that has seen better days. To cover up the old yucky expo that won't come off, I put up contact paper and sectioned off my board into: 
Schedule, What Do I Do?, Table Points, and Genres. 


The four frames will be where I write our schedule for that day. I also stole borrowed this wonderful idea from a fellow teacher friend! Next to it, under the yellow sign, I hang up that week's assignments that are for grades and need to be turned in as a visual reminder. My classroom is very fast paced since I only get a little over 2 hours with both classes each day. They don't get much time during instruction (my time) to work on assignments. I usually give them around 5 minutes just to get started and make sure they understand the directions. Then they put it in their I/C folder and work on it during workshop (their time). Displaying the work keeps them from interrupting my small group instruction. 


This is the "What Do I Do?" chart. We use this throughout the day but especially during workshop time. Workshop time is about an hour long at the start of the year, but gets longer as the year progresses. I display here exactly what they need to do, in the correct order, and their options for when they  have finished everything. I write all the possibilities on  sentence strips so it is easy to change them out or rearrange the order. On the bottom I can flip the card to turn AR Testing On or Off and open or close our library. This seriously helps the kids and me during workshop time. No one comes up to me to ask any questions or what they should turn in or if they can do a certain activity. The chart gives them all the directions they need! 


My have 6 tables, each a Continent so I use the world poster to keep track of my table points. I started this at the end of last year and it helped some much during our Continent unit. We all know how students obsess over table points (or at least mine!) so I figured with as much as they look up to count their table points they can also get an eyeful as to where the continents are! My reading table is Antarctica because it also has my "cooling off" bucket for students who need to just chill! 
Below my table points is where I display the genres we are focusing on. Under "reading" is the genre of the story we are reading and under "writing" is the genre of the paper that we are currently taking through the writing process. 


To the right of the white board is our "Writer's Wharf" and begins our writing corner of our room. Here I display our colorful word of the week and also where I display my example of the writing paper we are currently taking through the writing process. 


Here hangs our writing process. I use this to keep track of where each of my 44 students are in their writing. 


 I keep their writing portfolios here. Inside the spine of the binders will be a blue (my class) or green (partner class) strip with their names on it. In their portfolios they keep all the pieces they have taken through the process including the piece they are currently working on. We use tabs to separate our fiction and nonfiction writing along with having tabs for the writing process and helpful hints to use while writing. 
They use the revising and editing pens while, well, revising and editing! :) They use the colorful pens during publishing to write any colorful words they used. 
(I'm sure all of you have seen that on pinterest. It is amazing. Kids love it!) 


Next to their portfolio shelf is the writing table, or "Imagination Island" which I will cricut out, frame and put on top of the white tubs. The white tub keeps paper, construction paper, foam shapes and other craft items for them to use while they are writing. Here they can write and create anything. This is one of the Daily Five choices. 


Two pinterest inspired items on my back cabinets are our "Boggle Board" and our "Classroom Rules", decked out in bright colors and sea animals!


This is my reading/small group table and our word wall. A lot of my organizational tools and planning items are here since this is also where we (the ELA teachers) meet to plan! The rulers are stapled up for when the Fire Marshall shows up! 


Next to my reading table is our "Computer Coast" and our "AR Points" bulletin board where I keep a bar graph of how many points each student has. The two classes compete against each other each 9 weeks and the class with the most points gets a prize.  


This is the front of my classroom and where we meet for floor time. 


Underneath the whiteboard is our "Buddy Beach" where students read to someone during the daily 5 and afterwards discuss what they have read by filling our a story map.  (JUST noticed that it says Beach Buddy instead of Buddy Beach... grrrrrrrrrrrr......) 


Underneath my Elmo is our "Listening Lagoon" where the students listen to reading during the daily five. 


This is my teacher area. I love using curtains to hid all the books and binders on open shelves. 
See my next post to read about my blurt chart and how I handle management and having 2 classes! 


Which brings us full circle to our bulletin boards where I post the posters that relate to the topics we are currently learning about. Above it is prefix/root word/suffix information because that is something we really stress all year long! 


........and.......
 I'm DONE! So excited about this upcoming school year!! :) 


Happy Teaching Friends!